Flxpoint simplifies the process of fulfilling your orders by integrating with ShipEngine, a platform designed to streamline your shipping needs. ShipEngine eliminates the complexities of working directly with carrier APIs and protocols, allowing you to focus on managing your business.
With Flxpoint's integration to ShipEngine's API, you can:
- Rate Shop: Compare rates across multiple carriers to find the most cost-effective shipping option.
- Purchase Shipping Labels: Buy labels directly within Flxpoint, making order fulfillment seamless and efficient.
This integration empowers you to manage your shipping and fulfillment needs in one centralized platform where you already handle your orders.
For detailed instructions on setting up a ShipEngine account and connecting it to Flxpoint, please refer to our guide: ShipEngine & Flxpoint.
What's Required to Buy a Shipping Label?
The following are required to purchase a shipping label:
- An established ShipEngine Account that has at least one Carrier Account connected (see below)
- Package Details: From and To Address, Ship Date, Items and Qty to Include, Package Dimensions, and (Packed) Weight
-
The Source must have at least one source shipping method mapped to a shipping carrier with an associated carrier account connected on ShipEngine
Eligible Fulfillment Request Status
Shipping labels are directly associated to FR/FOs and can only be purchased when a FR/FO is "unprocessed."
Purchasing a Shipping Label
To purchase a shipping label, you must have an Unprocessed fulfillment requests or fulfillment orders.
Once you have an Unprocessed FR/FO, you will need to:
- Open the order
- Scroll down to the fulfillment requests/fulfillment orders section
- Find the FR(s) that need a shipping label
- Click Actions in the FR/FO
- Click Buy Shipping Label
A fly-out will appear with the following information to be completed in the top section:
Line Item Quantity
- You can choose the quantity of each line item for the shipping label
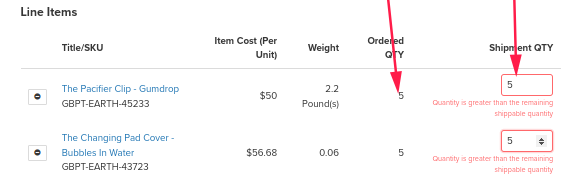
Next, under the Line Items section, specify which item(s) and how many will be shipped using this label. For any item(s) with weight associated, it will be used to estimate the total package weight in the next section.
- Note: Entire line items or partial quantity can be removed from the label as needed. This might be necessary when all items from the FR/FO cannot fit into a single package.
Afterward, enter the package details for your shipment. Some notes regarding this:
- Total Weight will be calculated by default to a sum of all available line item weights in the selected weight unit + the selected package weight (can be changed).
- Total Weight Unit will be selected by default as the weight unit of the selected package, or if none is added yet, the first line item (can be changed). Line item weights will be converted as needed.
- You must click Add Package to proceed with add supplementary package details; after a package selection is made, we will attempt to re-calculate and update the total weight and unit accordingly.
To select a default Carrier Package:
- The source must have a Source Shipping Methods connected to a Global Shipping Carrier Method
- The carrier must be connected on the provider account
- After choosing the carrier, select a package to continue creating your shipping label
Alternatively, you may want to create or re-use a custom package for your shipping label by clicking the Custom Packaging tab.
- All fields are required to save a new custom package.
- Click the checkbox "Save this package for future use" to save the package in Flxpoint to re-use again later.
After entering the shipment details and selecting your package, you must check rates before purchasing a label:
- Doing so will allow you to select the shipping method to use with the label.
- We will rate shop for the available and configured Global Source Shipping Methods and return estimates to select from (if more than one).
- Multiple rates (based on eligible package size) and/or multiple shipping methods could be returned; you must select your desired method for shipping.
- After selecting your method, click Add Method.
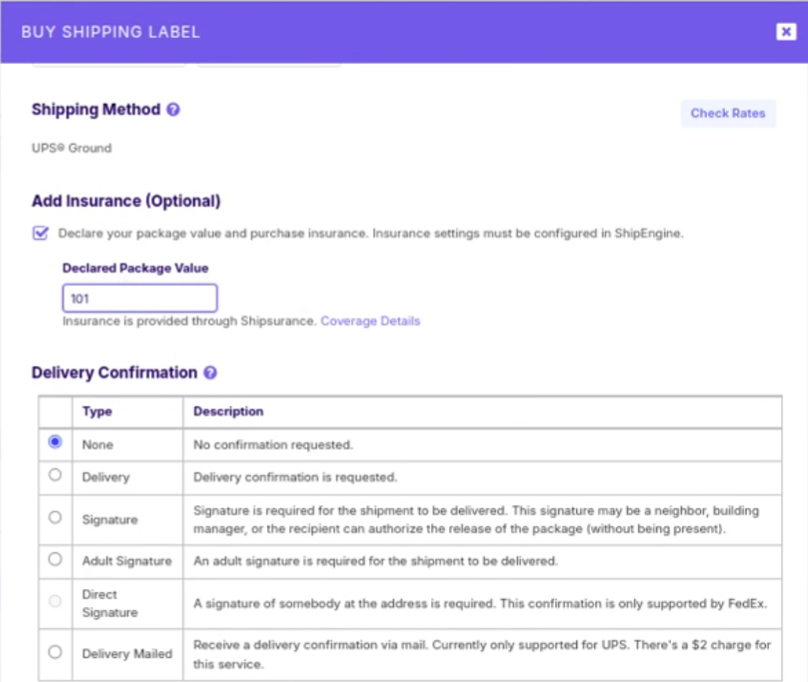
After a method is selected, you can add insurance to the order by declaring the package value.
Insurance
- The insurance is connected via a third-party software, Shipsurance
- Coverage Details can be found by clicking "Coverage Details" under where you input the package value
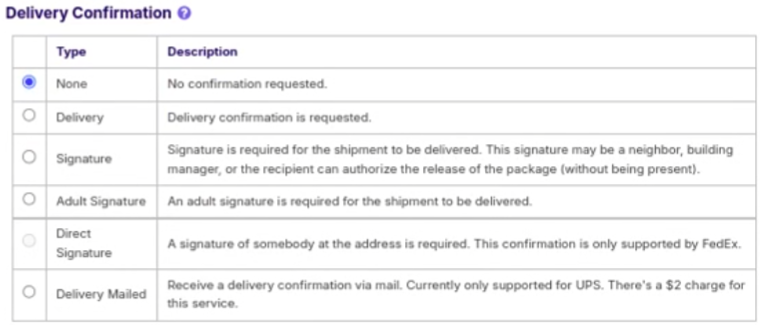
After you opt in or out of insurance, you can select the delivery confirmation method.
After you select your delivery method, the Estimated Rate including the price of insurance, if enabled, will be populated and the Buy Shipping Label button will be enabled.
- Label Size can be configured if needed (the default is 4"x6")
Once you have clicked Buy Shipping Label, you will be shown a preview screen to review the details on the shipping label before purchasing.
After successfully purchasing the label, you will receive a confirmation message and will be presented with the option to select a format (PDF, PNG, or ZPL) you'd like to have the label in to attach to your FR/FO (or you can skip this step). The main purpose of attaching to the FR/FO is for sending via an email integration.
Managing Shipping Labels
After a label is purchased, you may view and download or void the shipping label created for your FR/FO by selecting the Manage Shipping Labels action.
- A Label Purchased badge will appear on your FR/FO next to View Attachment(s) after you have successfully purchased a shipping label.
- If the label was added as an attachment, it will be available to view/download or delete via the View Attachment(s) button. Note: Deleting from here will only delete the attachment, not the shipping label reference in Flxpoint.
- After a label is purchased, to add it as an attachment, go to the Actions dropdown and click Add Attachment, then select Shipping Label from the dropdown, and upload the label file.
- If Update Channel with Shipment Details was enabled at purchase, a shipment will be created with the information from the package label.
- An entry can be found each time a label is purchased or voided in the Order Status History (see the order Actions dropdown in the top right-hand corner of the page).
After clicking Manage Shipping Labels, you will be presented with the shipping labels purchased for the FR/FO.
- For each label, you can view or void (if not previously voided)
- Once voided, there will be a timestamp marking when the void occurred
Printing Shipping Labels
To bulk print your shipping labels:
- Navigate to Orders >>> Fulfillment Requests
- Select the Checkbox next to desired fulfillment requests
- Click Print
- Select appropriate Shipping Label option
Vendor Portal: Send Shipping Labels
If you are using Flxpoint's Vendor Portal for sending FR/FO(s) to your vendors, once the FR has been processed with a purchased label, the shipping label will automatically be accessible to your vendor through the portal (without needing to attach the label to the FR).
- If a shipment was configured to automatically create, it will appear in the fulfillments section with the associated label and tracking number.
- If a shipment was not created, label(s) can still be viewed via the View Labels button.
- After a shipment is added with the associated tracking number, it will be visible with the label under the fulfillment section.
Automating Shipping Labels
Product Dimensions Required
In order to utilize Flxpoint's rate shopping and shipping label automation features, your products must have dimensions listed (i.e. width, length, weight, etc.).
If you are missing dimension information, you can add dimensions using our bulk customization tool.
Here's a useful Dimensions Customization Template to help you get started. Make a copy of this template, fill in your data, and upload the file into our customization tool.
Requirements to Automate Shipping Labels:
- Create and connect your ShipEngine account to Flxpoint.
- Enable shipping labels.
- Ensure funds are available in your ShipEngine account.
- Configure shipping your shipping management.
- Set your packing preferences (Flxpoint's best fit packages vs manually selecting package sizes).
- Decide if you would like to filter specific carriers and shipping methods.
- Configure your fulfillment request strategy.
- Add fulfillment request workflow rules to guide the shipping label purchase process. (Example rules shown below.)
*As of January 2024, enabling rate shopping is no longer required to auto-purchase shipping labels.
FR Workflow Rule Examples
Automate Shipping Labels Notifications
The automation of a shipping label may fail if errors are encountered during the rate shopping or shipping label purchase process. If this occurs, you will see an error notification displayed on the fulfillment request. You can also view the fulfillment request logs for more information on the error.
Enable Automate Shipping Label Failure Notifications
We recommend enabling notifications for when an automating shipping labels purchase fails. To do so, please follow these steps:
Global Settings Gear → Notifications → Enable Automate Shipping Label Failure Toggle. Once enabled, you will receive an email notification if the shipping label automation fails.
Automated Fulfillment Request Strategy
Automate Package Attachments
Enabling Automate Package Attachments will allow Flxpoint to automatically send shipping labels and/or packing slips along with the respective fulfillment request.
To enable auto attaching packing slips and/or shipping labels to the fulfillment requests:
- Select the desired source and click the settings icon
- Select fulfillment requests
- Select strategy
- Click on the toggle to enable auto-attachment
Limited Support: Auto-attachment is only supported for file-based, HTML, or PDF integrations.
Automate Fulfillment Tracking
Enabling Create Shipment From Shipping Label will allow Flxpoint to automatically create a shipment after a shipping label is auto-purchased and the Fulfillment Request is processed or acknowledged.
Manually Purchased Shipping Labels Not Supported: Create Shipment From Shipping Label will not apply to manually purchased shipping labels.
Adding Custom Messaging to Shipping Labels
Enabling Feature Required: To enable access to this feature on your account:
- Navigate to Feature Opt In/Out in the global settings.
- Locate the SHIPPING CARRIER CUSTOM LABEL FIELDS toggle.
- Click the toggle to enable.
- Click the blue update button to save.
To add custom messaging to shipping labels, Navigate to Global Settings, Select the Orders menu, Click Shipping Labels. , Select desired carrier (Carrier account must be connected to ShipEngine).
Map the following Flxpoint fields to any available field for each carrier:
- Fulfillment Request Number
- Order ID ( Read Only)
- Order Reference Number
Flxpoint Pro Tip: Adding Rules: Rules can be configured on each field to add additional data or modify the mapped value.
Character Limits: Any values exceeding the character limit will automatically be truncated upon label creation.
Shipping Labels & the Vendor Portal
If you are utilizing the Vendor Portal, you may now allow your ShipEngine integration to be shared with vendors so your vendors can create shipping labels directly from the Vendor Portal.
To enable shared ShipEngine access:
- Click on Sources
- Navigate to Vendors
- Select desired vendor
- Scroll to the bottom of the screen and locate Allow Vendors to Create Shipping Labels
- Click toggle to enable
- Click Update to complete
Once you have granted shared access to your vendor, your vendor has the following options on their fulfillment requests:
- Buy Shipping Label = create and buy new shipping labels
- Manage Shipping Labels = view and download previous shipping labels
Shipments Automatically Created: When your vendor purchases a shipping label, a shipment will automatically be created.
Frequently Asked Questions


